Template

Showing posts with label recommendations. Show all posts

Saturday, March 10, 2012

Project Life - January 1-15

I have decided to jump on the bandwagon and do Project Life. This is kind of similar to the Project 12 that I did last year but with divided page protectors. You can read more about Project Life here. I am using the page protectors from Becky Higgins, and other stuff from my stash. Some people do this with a picture a day, a 2 page spread per week. This seemed a little extensive to me, so I am doing 2 or 4 page protectors per month depending how many photos I take. This month it will be 4.

I know that I am behind, but I have been taking a picture a day so I think that I can manage. I also have a new toy which I absolutely LOVE - the Silhouette Cameo

Here is my first 2 page spread:


TFL!

Thursday, September 9, 2010

Making Memories Slice

Hey Guys,

The budget is getting a little bit tight lately, so after much deliberation, I have decided to sell my Slice.  It is very lightly used, and I have 5 design cards to go with it.
So if you are interested in getting a Slice, please take a look.

Here is the listing
 Ebay Listing

Tuesday, February 23, 2010

I won!

There was a contest on Photo Express' facebook page to upload a photo of a card that you have made recently to be entered to win a Sassafrass Lass card kit. So I uploaded a picture of the valentine I made Steve, and I Won!
Here's what the kit makes:Thanks Steve! for being my Valentine, and of course thank you Photo Express!!
There website is here if you want to check them out.

Friday, March 27, 2009

Creating Your Own Rub-Ons

If you look up "making your own rub-ons" on google, you will get many answers. You can buy special paper, special glue, special transparencies etc. I haven't tried any of these, because I don't want to put the money into something that might not work. So, I chose the cheapest way I could find. Printing on a page protector and rubbing it onto my page. A few months ago I tried this on my cousins baby book, with pretty bad results. It printed out all globby, it smeared everywhere, and it just looked really bad. With the past layout I was working on, I decided to give it another try. I didn't have any letter stickers or chipboard to match my layout, and didn't want to write my title on. Here are the steps of what I did:

  1. Get an overhead transparency (or the cheaper way) a page protector.
  2. Cut the page protector down to size (ie cut the holes off so it is 8 1/2 x 11)
  3. Create your design on the computer
  4. The image will be inverted once you put it on your page, so remember to flip your design especially if it is words (you can use any paint program to flip your image, I used photo shop and selected "flip horizontally" after I was done. You can also use Microsoft word for your words, just make sure to use the "Word Art" option, as you can't flip regular text.)
  5. Set up your printer. This is the one I had to play around with for a while, as I said, my first attempts came out globby. Using photoshop worked out the best, because it had better printing options. I chose the setting for high quality photo, and glossy photo paper. This way enough ink is deposited onto the transparency.
  6. Print your design onto the transparency.
  7. This is the important step (the one I neglected when I tried the first time) LET IT DRY. I was thinking if I let it dry fully that it wouldn't come off onto my paper, so I put it on my paper early, and it smudged everywhere. Let it dry for at least 10 minutes. I know...it's hard for us impatient people.
  8. Put the transparency ink side down onto your paper. Make sure it is exactly where you want it before you touch the paper, because some ink will be deposited right away.
  9. Hold it down firmly, and use a popsicle stick to rub it onto the page (just like a regular rub-on) you will see the ink darken in places where it has transfered to the page. When it all looks like this, remove the transparency..you are done :)
It doesn't look exactly the same as a store bought rub-on, but it works in a pinch. I would reccommend trying it on a scrap piece of paper first before putting it onto your layout. For me it took a few tries to get it right. Play around with the printer settings and designs, see if you like it.
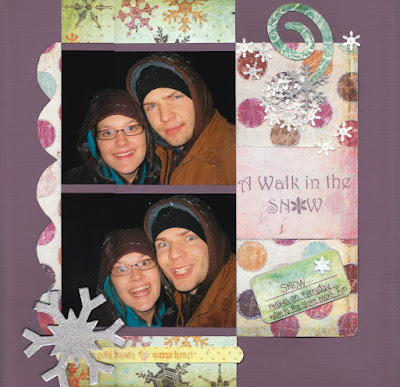
Here's my layout that I used this technique on. The title "A Walk in the SNOW" is the rub-on I created. Let me know what you think :)


Update: This only works on an inkjet printer. Also, if you choose to buy transparencies to do this, don't get the ones for inkjet printers (the whole point of those is for the ink to stay on the transparency, therefore it won't transfer)

Monday, March 23, 2009

Another Kitty Cat


Another layout of a cat that isn't mine..hah. T.C. (which stands for tailless cat) is quite an old cat, but she still has great personality. Everyone calls her "puppy kitty" because she follows you around like a puppy, and when you call her she will come. Around the layout I wrote the many other nicknames of T.C. For the doodles around the corner I used Making Memories doodles rub-ons. I love using rub-ons because they can go over many different layers. Just make sure you rub really hard, and that they are stuck down to your page before you pull off the plastic, if not they could rip. Let me know what you think :)

Friday, March 13, 2009

Sketches

I have been looking through the sketches on the link that I posted, and so far my favorite site on there is Pencil Lines. It is a sketch challenge blog, so basically they upload a new sketch every week and see what people can come up with. Right now I'm not really looking for a challenge, I am looking for guidance and some inspiration, so I didn't use the current challenge sketch, I browse through the previous sketches to see what I could use. For my Pirates of the Caribbean Page a few posts below I used Sketch 113 . Sometimes it is hard to see what you can come up with with just a sketch, thats why I like that they post some layouts done with the sketch to give you a better idea.

Tuesday, March 10, 2009

Saturday, March 7, 2009

Embossing Powder....not just for stamps

Over a year ago, a friend of mine gave me a stamp and some silver embossing powder. She had used it for her wedding invitations, and didn't need it anymore. I used the stamp once for a Valentines day card, but then after that I couldn't think of a way to reuse it, but I liked the effect that the embossing powder gave to it. I didn't want to buy more stamps, because I didn't know if I would get into it, so I bought an embossing pen. It's called "ZIG Emboss Writer". Basically its just a felt pen, with two different ends (one with fine point, and one thats a bit thicker) and it has almost invisible ink that takes a while to dry. With this you can emboss whatever design you can draw or write. Something fun that I tried was to make one of my papers more exciting with embossing glitter, here is a sample of what I did:


I basically just outlined the pattern on the paper with the thicker tip of the embossing, then sprinkled "Stardust" transparent embossing powder on it, shook the excess of, and then used the heat tool to set/raise the embossing powder. You can't tell on here very well, but it made the paper sparkle very much. Another thing you can do with the embossing pen is use it to emboss your writing. I used it, with silver embossing powder, here as a title for one of the pages in the baby book:


If you are just starting scrapbooking, it is a little expensive to buy the heat tool. I have tried hair dryers and car lighters, but the results are very inconsistent. I would recommend waiting for a 40% off Michaels coupon, and buying the heat tool then. If you already stamp, this would be a cheap thing to try, if you haven't already.

The products I used:

Marvy Embossing Heat Tool
ZIG Emboss Writer (with 0.5mm and 1.2mm felt tips)
Stampendous - Stampi-N Stuff Embossing Powder in "Detail Silver Opaque and Stardust Transparent"

All of these items were purchased at Michaels
Here is a link for the current 40% off Coupon : http://vancouver.flyerland.ca/view_coupon.php?coupon_id=1315#
If you are looking for coupons in your own area, just go to the flyerland website , type in your city and go from there.

Monday, March 2, 2009

So You Want to Start Scrapbooking?

The Basics For Beginners

For some people, including me, going into a scrapbooking store is overwhelming when you first start. There are so many different tools, stickers, papers etc. What do you start with?
I would recommend not starting in a scrapbooking store. Superstore, Zellers, and Walmart all have sections for scrapbooking. Sure their selection isn't as great, but they are often cheaper and will carry the basics that you will need to get started.

This is what you will need:
  • Photos
  • Album
  • Paper
  • Cutter
  • Adhesives
  • Pen
Albums come in different sizes and formats. My first and only scrapbook so far was 8 1/2" x 11", and I will probably never make one that size again. Most papers and kits come in 12" x 12", so I would recommend getting an album that size. It is also a good idea to get a post bound album, they have top loading page protectors, and are expandable, so you can add pages as you need to.

Paper is the base of all scrapbook layouts. For just starting out some 12" x 12" Cardstock in solid colors will do just fine. You can get packages that have a variety of colors.

Scissors and an X-acto Knife will be your best cutting tools to begin with. To cut straight lines I use a metal ruler and a cutting mat. Just line the ruler up on the paper where you want to cut, and then drag the X-acto knife along the edge of the ruler. Don't do this without something to cut on, or you will end up with nasty cuts on your desk or table top. To cut other shapes use scissors.

Adhesives put it all together. There are many different choices, its just a matter of personal preference. You can use, glue sticks, glue runner, or my personal favorite adhesive squares. Just make sure the adhesive you choose is acid free, so you don't ruin your photos.

A Pen is used to add journaling. Write what the picture is, what was going on when the picture was taken, or how you felt when it was taken.

With these items you can make basic layouts. Use your creativity and see what you come up with. The fancy tools, stickers, and papers come later. Have fun with it.